Assignment 13 — Working with Tables and Lists

Description:

The assignment for this week will introduce the elements that you need to build and format a table. You'll also learn how to customize the bullets within a bullet list.

Basic table elements

The elements that you use to create a table include:

  • <table> - provides the container for the table
  • <caption> - defines a caption for a table
  • <tr> - defines a row in a table
  • <th> - defines an individual table cell in the heading row of a table
  • <td> - defines an individual table cell in a row of a table

The following code sample illustrates the layout of a 2-row, 2-column table with a header row.

<table>
<caption>This is the table caption.</caption>
<tr>
<th>Header - 1st column</th>
<th>Header - 2nd column</th>
</tr>
<tr>
<td>Row 1 - Column 1</td>
<td>Row 1 - Column 2</td>
</tr>
<tr>
<td>Row 2 - Column 1</td>
<td>Row 2 - Column 2</td>
</tr>
</table>

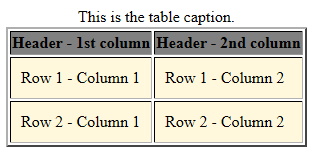
A browser would render this sample as follows:

Formatting a table

You can set properties on the elements to do such things as format borders, add padding, set background colors, and so on. For example, this style definition:

table {border: thin solid 3px; }
 td {background-color: cornsilk; padding:10px;}
 th {background-color: gray;}

would format the table as follows:

You can nest a table within a table, by embedding the second table within a <td> element.

Spanning rows

You can use a rowspan attribute on a <th> element to enable a cell to span multiple rows:

<table>
<caption>This is the table caption.</caption>
<tr>
<th>Header - 1st column</th>
<th>Header - 2nd column</th>
</tr>
<tr>
<td rowspan="2">Row 1 - Column 1</td>
<td>Row 1 - Column 2</td>
</tr>
<tr>
<td>Row 2 - Column 2</td>
</tr>
</table>

The <td> element with the rowspan attribute would span to the second row:

Formatting bullet lists

You can use the list-style-type CSS property on list items to give them different bullet styles.

List-style-type property Example
li {list-style-type:disc;}
  • example
li {list-style-type:circle;}
  • example
li {list-style-type:square;}
  • example
li {list-style-type:none;}
  • example
li {list-style-image: url(images/united_kingdom_great_britain.png)}
  • example

For more information about tables and lists, see Chapter 13 of the Head First HTML and CSS book.

HTML elements:

<table> <tr> <th> <li>
<td> <caption> <ul>  
CSS elements:
list-style-type list-style-image border-collapse caption-side
Videos:Working with Tables and Lists

Tasks:

  1. Read and complete the exercises from Chapter 13 of the Head First HTML and CSS book.
  2. Create a folder named Chapter13.
  3. In your Chapter13 folder, create your customzied versions of the following files.
    • journal.html
    • journal.css
    • minimum of four images (including one for the bullet list)
  4. Ensure that all of your links work correctly and display the appropriate file when clicked.
  5. Validate each of the HTML pages at https://validator.w3.org/. Fix any errors that occur.
  6. Upload the contents of your Chapter13 folder to your website.
  7. Zip your Chapter13 folder and name the file yourName_chapter13.zip.
  8. Submit the zipped file through Blackboard. In the comments section in Blackboard, enter a URL to the files on your website.
Grading criteria:

Your assignment should demonstrate:

  • Revising the file from Assignment 8 to include a table by using the <table>, <tr>, <th>, and <td> elements.
  • Creating a CSS rule to add a background color to the header row of the table.
  • Creating a CSS rule to alternate the color of rows.
  • Using the rowspan attribute to span content across two rows.
  • Including a nested table within the table.
  • Using images as bullets for the items (<li>) within an unordered list (<ul>).
  • Formatting the borders within the table.
  • Validating your HTML and CSS files and correcting any errors.
  • Uploading your files to your website.
Due: Due 12/4

Example assignment:

Chapter 13 example