Linking within DITA
Overview
DITA offers several types of hyperlinking:
- Hierarchical linking – Links that occur based on the hierarchy within maps.
- Collection-type linking – Links based on the relationship among nested topics within maps.
- Relationship table linking – Links defined between topics that are defined within tables in maps.
- Inline linking – Links inserted within topics in which you explicitly specify the topic or resource to which you are linking.
Hierarchical linking
Hierarchial linking occurs automatically based on the hierarchy defined in your map. PDFs include a TOC; HTML output usually include links to subordinate topics.
So, for example if you had the following hierarchy in your DITA map:
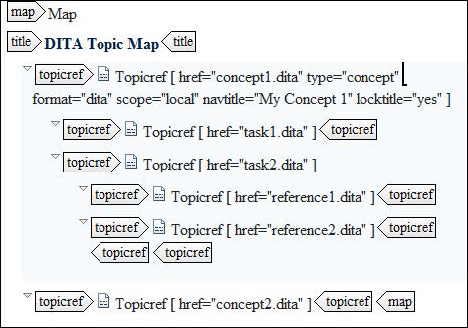
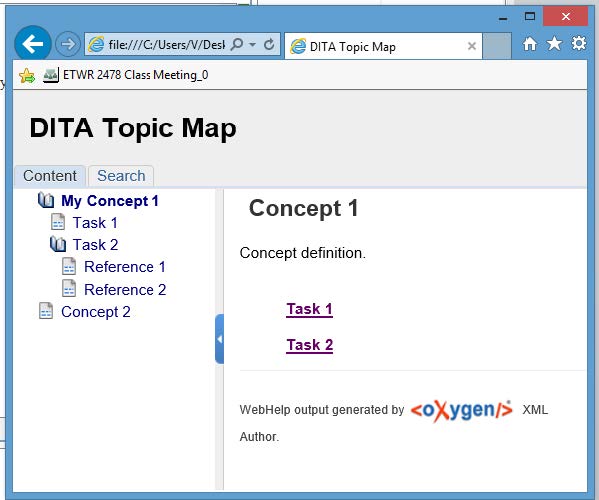
The output would contain render something like the following in web help format. In the Content pane, Task 1 and 2 are subordinate to Concept 1, while Reference 1 and 2 are subordinate to Task 2. Notice that when Concept 1 is displayed, it had Task 1 and Task 2 links automatically generated within it.
Collection-type linking
Collection-type links are based on the relationships between nested topics in a map defined in the linking and collection-type attributes. You can specify these attributes on
- <topicrefs> elements
- <topicgroups> elements
- columns in relationship tables
The linking attribute allows you to specify whether a link should appear in only one of the topics within a relationship.
Attributes on topicrefs that affect linking
Atribute |
Values |
Description |
linking
|
targetonly |
A topic can only be linked to and cannot link to other topics. |
sourceonly |
A topic cannot be linked to but can link to other topics. |
normal |
A topic can be linked to and can link to other topics.
Use this to override the linking value of a parent topic. |
none |
A topic cannot be linked to or link to other topics. |
collection-type
|
family |
Indicates a tight grouping in which each of the referenced topics not only relates to the current topic but also relate to each other. |
sequence |
Indicates that the order of the child topics is significant; the transform will typically link between them in order. |
unordered |
Indicates that the order is not significant. |
choice |
Indicates that one of the children should be selected. |
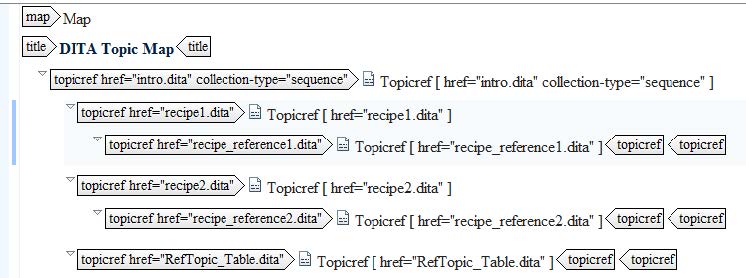
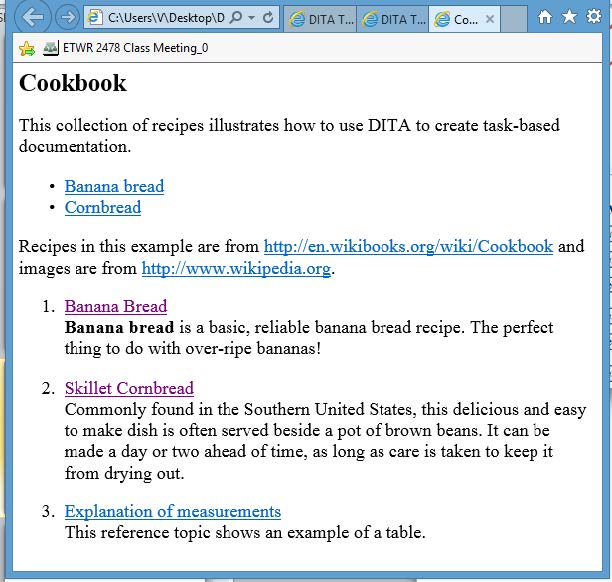
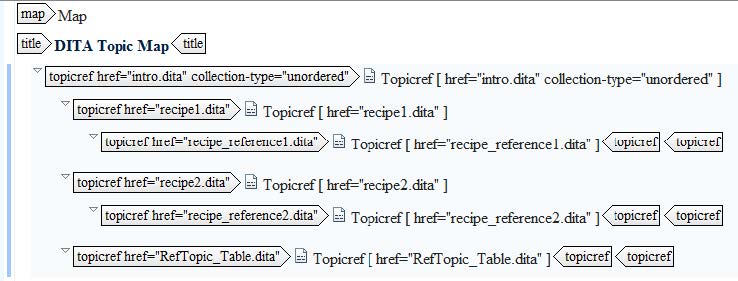
The following example illustrates a collection-type set to sequence.
| File |
Example |
| Source |
 |
| Output |
 |
The following example illustrates an example of the collection type set to un-ordered:
| File |
Description |
| Source |
 |
| Output |
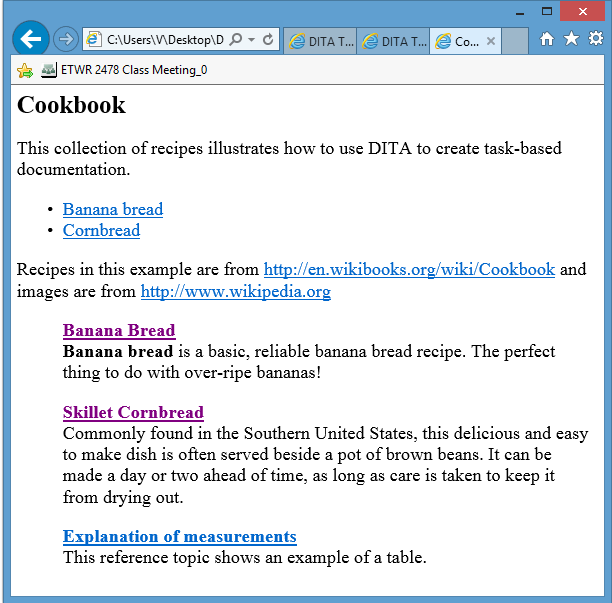 |
Relationship tables
Use relationship tables in the map to define hyperlinks between topics referenced within the map.
The transform process creates a list of related topics at the end of topics based on the defined relationships.
Within cells in the relationship tables, you define <topicref> elements to create relationships between designated topics. The transformation then creates the hyperlinks among the topics referenced in the row.
Each cell can contain multiple topic references.
Relationships between topics
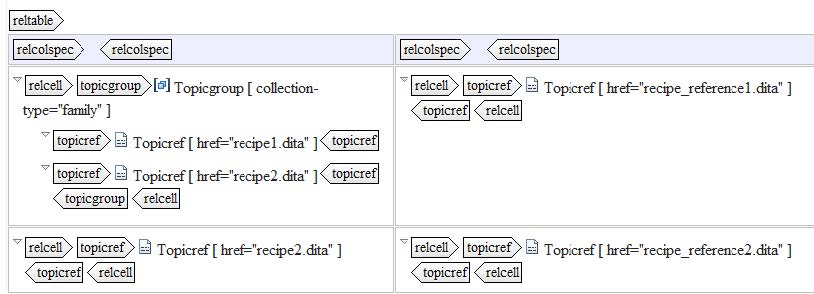
In a relationship tables, relationships are defined by rows:
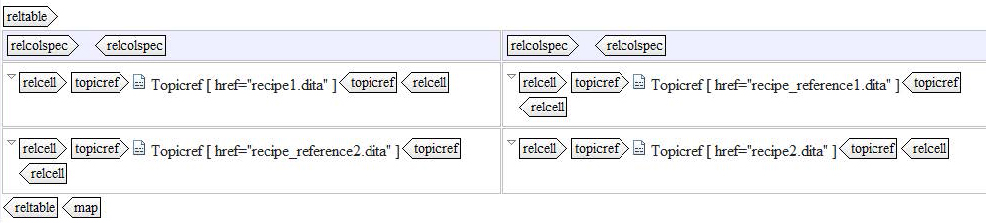
In this example:
- Recipe1.dita is related to recipe_reference1.dita.
- Recipe2.dita is related to recipe_reference2.dita.
- Recipe1.dita is not related to recipe_reference 2.dita.
- Recipe1.dita is not related to recipe2.dita.
- Recipe2.dita is not related to recipe_reference1.dita.
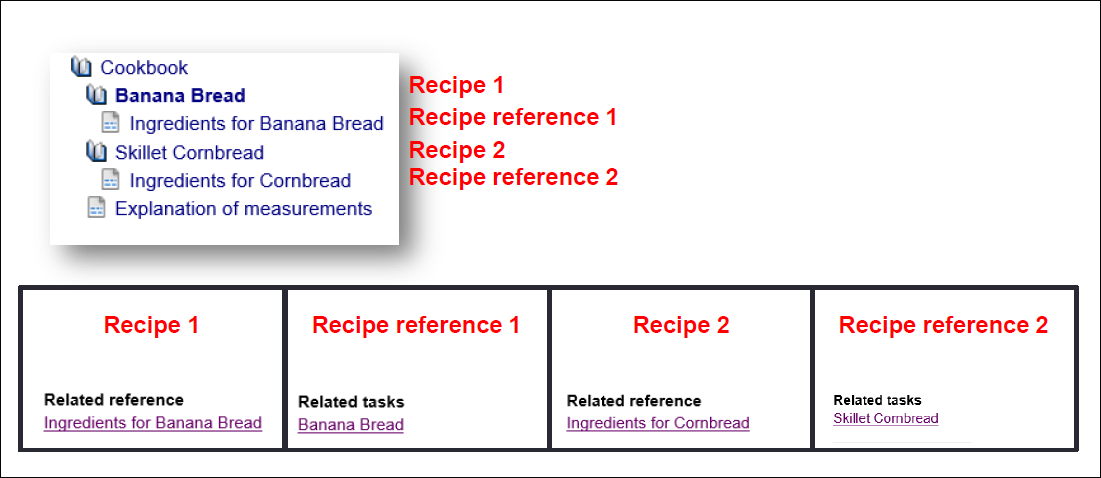
Examples in output
At the bottom of the topic in HTML output, a link appears to the information:
When to use relationship tables
When should you use a relationship table?
- When the information is “nice-to-know” or supplemental to the topic.
- When the location of the link is not critical (for example, a link in a concept topic that points to another concept topic that has general related information).
- When you don’t know if topics will always travel together in other deliverables. (Putting links in the relationship table removes hard coded links from within the topics and makes the topics more able to stand alone.)
What are the issues with relationship tables?
- Every map that reuses the topics has to redefine the relationships between topics.
- The information always appears at the end of the topic.
Two-way links between topics
Task |
Concept |
Reference |
Topicref – Task A |
Topicref – Concept A |
Topicref- Reference A
Topicref – Reference B |
This relationship table would result in the following links within the topics:
- Task A links to Concept A and Reference A and B.
- Concept A links to Task A and Reference A and B.
- Reference A links to Concept A and Task A.
- Reference B links to Concept A and Task A.
- Reference A would not link to Reference B. (Topics in the same cell do not link to each other.)
One-way links between topics
Assume you have the following relationship table:
Task |
Concept |
Reference |
Topicref – Task A |
Topicref – Concept A |
Topicgroup with linking set to
targetonly
Topicref- Reference A
Topicref – Reference B |
In a relationship table, you can create a link that occurs in only one of the two topics in the relationship. To create a one-way link, set the value of the linking attribute to targetonly.
In this example:
- Task A links to Concept A and Reference A and B.
- Concept A links to Task A and Reference A and B.
- Reference A and Reference B do not link to Concept A, Task A, or each other.
Alternatively, if you changed the linking attribute of the <topicgroup> element to sourceonly, Task A and Concept A would not link to Reference A and B. However, Reference A and B would link to Task A and Concept A.
Links between topics within the same table cell
Assume you have the following relationship table:
Task |
Concept |
Reference |
Topicref – Task A |
Topicref – Concept A |
Topicgroup with collection-ype set to family
Topicref – Reference A Topicref – Reference B |
This relationship table would result in the following links within the topics:
Sequential links between topics
Assume you have the following relationship table:
Task |
Concept |
Reference |
Topicgroup with collection- type set to sequence
Topicref – Task A
Topicref – Task B Topicref – Task C |
Topicref – Concept A |
Topicref- Reference A |
Having a collection-type of sequence would ensure that the tasks in that topic refer to the next and previous topic.
This relationship table would result in the following links within the topics:
- Task A links to Task B. Task A also links to Concept A and Reference A.
- Task B links to Task A and Task C. Task B also links to Concept A and Reference A.
- Task C links to Task B, Concept A, and Reference A.
- Concept A links to Task A, Task B, Task C, and Reference A.
- Reference A links to Task A, Task B, Task C, and Concept A.
Inserting a relationship table
- Position your cursor right before the ending tag for the map.
- Select DITA > Relationship Table > Insert Relationship table.
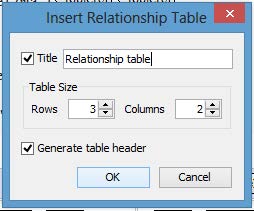
- In the Insert Relationship table, specify:
- A title for the table
- The number of rows
- The number of columns
- Generate table header
- Click OK.
Adding topics to the relationship table
- Position your cursor within a table cell in the first column.
- Select DITA > Insert > Insert Topic Reference.
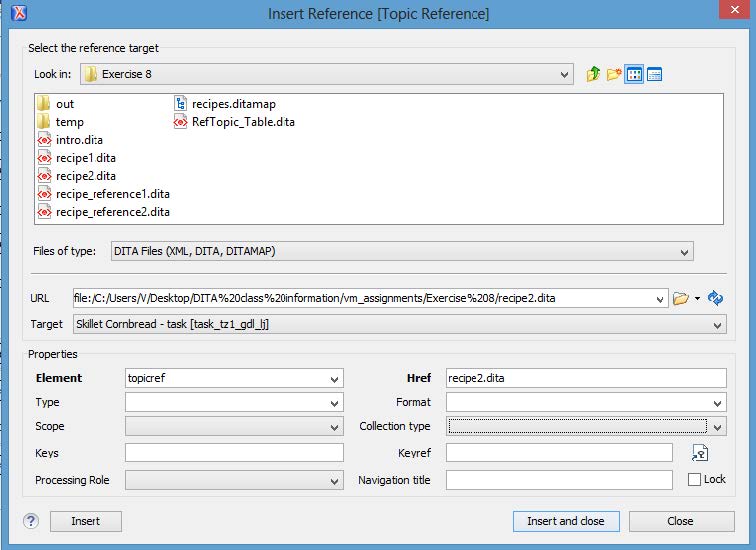
- Click the folder icon next to Look in field and navigate to the folder containing the topic.
- Select the topic to which you want to link.
- Click Insert and Close.
- In the second column of the table in that row, repeat steps 2 through 5 for each topic that you want to include.
Setting attribute values for <topicrefs> in a single cell
- Select the <topicref> elements.
- From the Elements list, select the <topicgroup> element.
- Position your cursor within the <topicgroup> element.
- In the Attribute list for the <topicgroup> element, set the linking and collection-type attributes to the desired values.
Working with inline links
Inline links are specified within topics instead of maps.
Use inline links to link to:
- other topics
- e-mail addresses or external URLs
- sections, figures, tables, steps, and substeps within topics
Best practice is to limit the number of inline links:
- Inline links disrupt the flow of a topic to point a user to another topics.
- Inline links make topics dependent on one another.
Too many inline links might indicate that the flow of your information needs to be examined.
Inline links use the <xref> element.
<xref href="recipe2.dita#task_tz1_gdl_lj">Cornbread</xref>
When to use inline links
- Use links to make sure that you link to prerequisite information that the reader must know before reading this topic.
- Link to tables or figures when it might be confusing as to which one you are referring to.
- Link to repeated steps.
- Create high-level tasks with links to subtasks in complicated procedures.
Inserting a link to another topic
You create links to another topic with an <xref> element. The link will have the following format:
<xref href="concept2.dita#concept_trb_1bl_sj"/>
The href attribute specifies the topic to which you are linking. The value for the href should be the file name, following by the pound sign, and then the ID of the element to which you are linking. In this case, concept2.dita is the name of the xml topic, while. #concept_trb_1bl_sj is the the ID of the element to which you are linking.
In oXygen, complete the following steps to create an inline link to a topic:
- Position your cursor where you want to insert the link and select DITA > Link > Cross-reference.
- In the Insert Reference window, click the folder icon next to URL, navigate to the topic to which you want to link, and click Open.
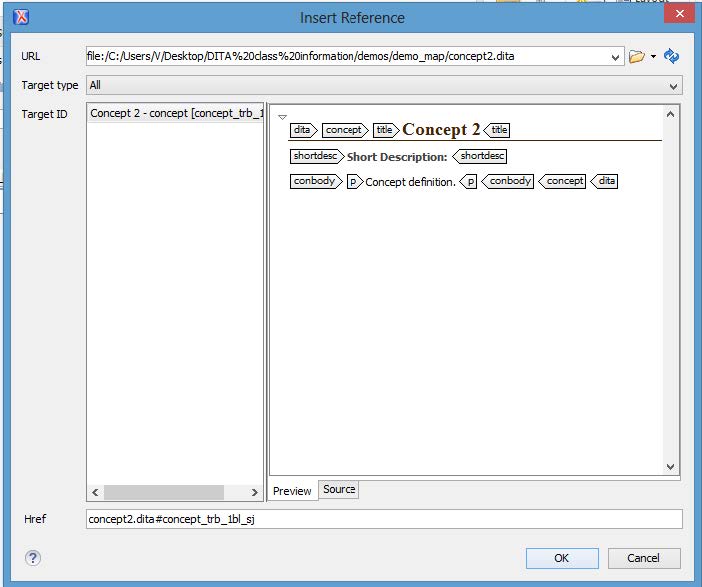
- In Target ID list, ensure that you click the title of the topic.
- Click OK to insert the link.
Inserting a link to a step
One of the common things people link to is a specific step. To link to a specific step, that step must have an ID. The format of the link will be as follows:
<step>
    <cmd>Repeat <xref href="#task_wq1_31l_lj/mystep1" format="dita"/></cmd>
 </step>
To create a link to a step, complete the following steps:
- In your target topic, ensure that you specify an ID attribute for the step to which you want to link.
- In the topic in which you want to insert the link, position your cursor where you want to insert the link and select DITA > Link > Cross- reference.
- In the Insert Reference window, click the folder icon next to URL, navigate to the topic to which you want to link, and click Open.
- In Target ID list, select the step to which you want to link:
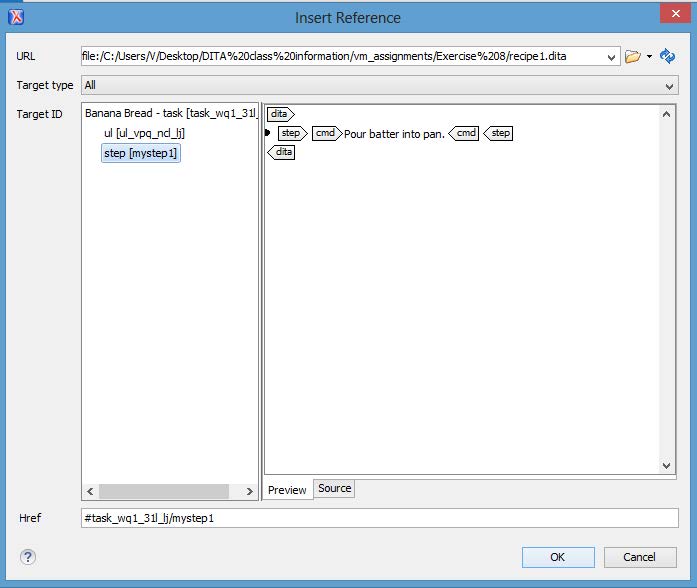
- Click OK to insert the link.
Inserting a link to a website
To create a link to a website, you set the href attribute of the xref element to the url of the website to which you are linking:
<xref href="http://www.wikipedia.org/">href=http://www.wikipedia.org</a>
Complete the following steps:
- Position your cursor where you want to insert a link.
- Select DITA > Link > Web Link.
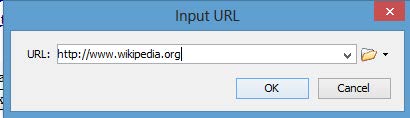
- In the Input URL window, enter the address of the web page and click OK.