First, the lesson describes entities. Entities allow you to define information in a single place and then reuse it in multiple locations within your XML files. You've already been introduced to character entities for some of the XML special characters (such as <, &, and >). In this lesson, you'll learn how to create your own general entities. You'll also learn how to make parameter entities that allow you to reuse DTD structures in multiple DTDs.
In addition to entities, the lesson this week will cover some rudimentary CSS so you can provide some basic formatting to the HTML output produced by your XSL transformations.
Introducing entities
This section describes two different types of entities:
- General entities, which load data into XML documents
- Parameter entities, which reference data that becomes part of the DTD
The following table provides examples for each type of use:
| Entity |
Example Uses |
| General Entity |
- Use a general entity for common strings of text that you would like to define in a single place
- Use a general entity for a company name so that can ensure that writers always insert the company correctly
- Use a general entity for a product name that is likely to change so that you only have to change it one place
|
| parameter entity |
- Use parameter entities to reuse a DTD as part of a larger structure.
- For example, you might use the definition for a contact element (and its children) in both a customer list and an employee list.
|
Defining a general entity
For a general entity, create an <!ENTITY> statement in your DTD with the follow syntax:
<!ENTITY entityName "entityValue">
Where:
- entityName is the name of the entity.
- entityValue is the value you would like to substitute wherever you place that entity reference in your XML instance file.
You then refer to that entity within your instance file with the following syntax:
&entityName;
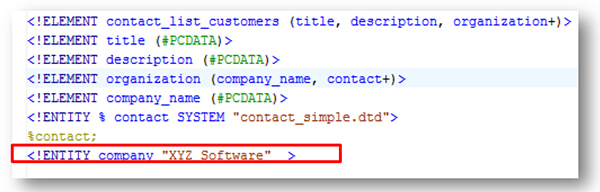
For example, you can define a general entity in your DTD for a company name:
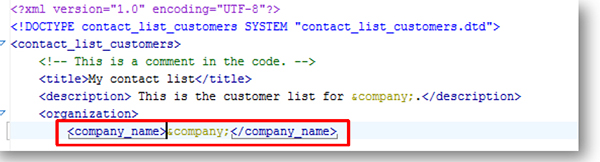
You can then reference it in your XML instance:
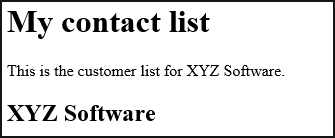
Note that you can use the reference for the entity multiple times within your file. When you transform your document, it substitutes each reference to the entity with the value specified in the DTD:
If you change the value in your DTD:
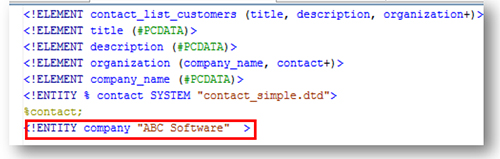
The value will change in your output the next time that you generate the transformation (even if you don’t edit your XML instance):
Using an entity to embed other XML files
You can also use general entities to include other files within an XML instance file. When you do this, the contents of the files are inserted into the document at the location where you specified the reference.
The syntax is a little bit different, because you must include the word SYSTEM to indicate that it is a system file.
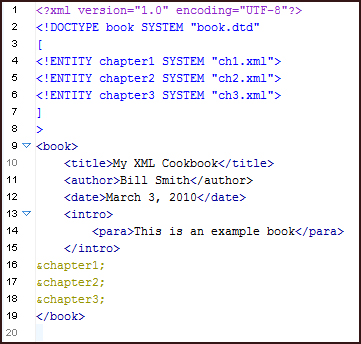
When you embed one XML file within another XML file, you must ensure that its contents are valid within that location according to the DTD. In the previous example, if the <!ELEMENT> statement that defines the <cookbook> element is as follows:
<!ELEMENT cookbook (cookbook_title,byline,foreword,recipe+)>
The contents of the recipe1.xml, recipe2.xml, and recipe3.xml file must have <recipe> as the root-level element:
<?xml version="1.0"    encoding="UTF-8"?>
<recipe>
...
</recipe>
The &recipe1;, &recipe2;, and &recipe3; entities are inserted after the closing </foreward> element and before the closing </cookbook> element. According to the cookbook element model, the only elements allowed at that location are one or more <recipe> elements. When you validate or parse the XML instance, the parser substitutes the text found in the recipe XML instance files for the entity references. If the substituted content is not valid for that location in the file, the validation process issues error messages. You must ensure when you use general entities to embed XML files that the embedded contents are valid at the location where you insert them.
Defining a parameter entity
Parameter entities allow you to re-use DTD structures. A parameter entity uses the following syntax:
 <!ENTITY % contact SYSTEM "contact_simple.dtd">
 %contact;
- The <!ENTITY> statement defines the entity and the file location.
- The %contact; value pulls the content from the referenced DTD file.
Note the use of the % sign in the <!ENTITY> statement and in the reference.
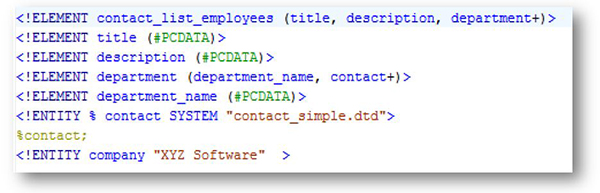
In the following example, both the customer list and employee list contain a series of contacts, but the other elements in the DTDs are different. Both DTDs can point to the simple_contact.DTD to pull the structure from that DTD document into themselves.
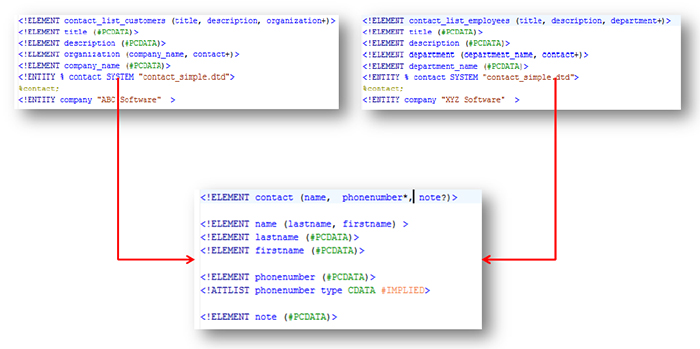
This example includes three DTD files:
- The contact_list_customers.DTD defines the structure for a list of organizations and the contact information for customers associated with each organization. Note that the structure includes a title, a description, and the list of organizations. Each organization will include a company name and the list of contacts associated with that organization.
- The contact_list_employees.DTD defines the structure for a list of departments and the contact information for employees within that department. Note that the structure includes a title, a description, and a list of departments. Each department will include the department name and the list of employees associated with that department.
- The contact_simple.DTD defines the structure for a single contact, including a name, zero to many phone numbers, and an optional note.
Note that the <organization> element within contact_list_customers.DTD and the <department> element in contact_list_employees.DTD include one or more <contact> elements. Instead of defining the <contact> element within those DTDs, both include an entity reference to the contact_simple.DTD.
 <!ENTITY % contact SYSTEM "contact_simple.dtd">
 %contact;
When you parse or validate the DTD files, the processor substitutes the parameter entity with the contents of the contact_simple.DTD file so that the elements within that file become available in the referring DTDs.
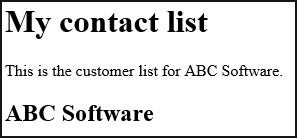
For example, the following XML instance file uses the contact_list_customers.DTD file, but it can contain elements from both contact_list_customers.DTD and contact_simple.DTD:
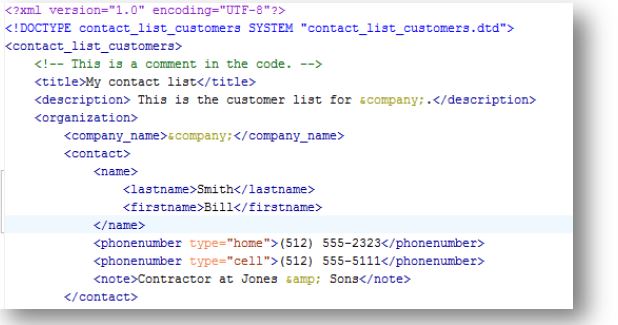
Note that the XML instance only refers to one DTD. The other elements are pulled in via the parameter entity in the DTD itself.
The DTD that pulls in another DTD is sometimes also called a shell DTD:
Parameter entities give you the ability to reuse and repurpose DTDs into a variety of contexts. For example, assume that you created a DTD for a simple task that included just steps and a DTD for a tutorial task that would include steps, goals, results, and so on. You could define the structure of the steps in just one place and reuse it everywhere. That way if later you wanted to redefine what is in a step, you could change it on one location instead of multiple DTDs.
DITA, which is covered later in the semester, makes extensive use of parameter entities.
Basics of CSS
CSS (cascading stylesheets) allows you to apply styles to XML and HTML documents. Without CSS, you can use HTML elements to structure your document, and the browser will format the elements by using default values when you view the file. CSS allows you to specify specific formatting properties for your document.
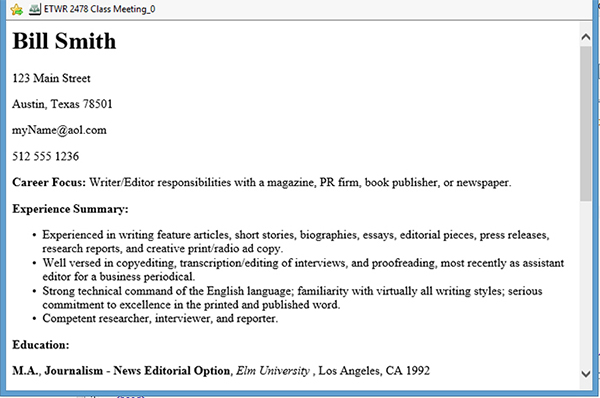
The following example shows how a resume would look by using just the default styles for the browser in which you are viewing the file.
Example of resume with default formatting
The following example shows the same HTML file in which additional styles are specified by using a CSS stylesheet.
Example of resume with CSS styles applied:
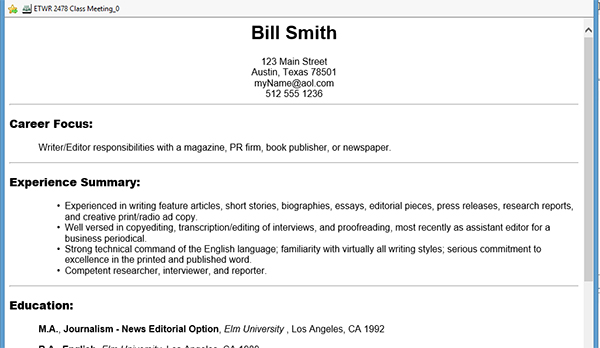
With CSS, you are able to customize the formatting and layout of your documents.
Adding style to your XSL file section of your XSLT
You can add CSS statements directly into your XSL file. As you saw in the last lesson, you create the skeleton for the HTML file within your XSL file. You can add CSS statements within a <style> element that is included in the <head> element. Ensure that you add the <style> element to the correct location in an HTML file for it to be valid.
The following example illustrates this approach:
<?xml version="1.0" encoding="UTF-8"?>
<xsl:stylesheet
xmlns:xsl="http://www.w3.org/1999/XSL/Transform" version="1.0">   <xsl:template match="/">
    <html>
     <head>
        <title>Resume</title>
        <style>
          body { font-family:arial; }
          ul { margin-left:55px; }
          h1 { text-align:center; }
          p.address {
             margin-bottom:0px;
             margin-top:0px;
             text-align:center;
          }
          p.careerfocus { margin-left:50px; }
      </style>
    </head>
    <body>
      <xsl:apply-templates/>
     </body>
    </html>
  </xsl:template>
</xsl:stylesheet>
Adding style through an external stylesheet
You can also add a link that references an external stylesheet to your XSL file. If you add styles by creating an external stylesheet, ensure that the external stylesheet file has a CSS extension. You can then define CSS properties within that file. Instead of adding a <style> element to your XSL file, add a <link> element within your <head> element that points to the CSS file that contains the properties.
The following example illustrates this method:
<?xml version="1.0" encoding="UTF-8"?>
<xsl:stylesheet xmlns:xsl="http://www.w3.org/1999/XSL/Transform" version="1.0">
   <xsl:template match="/">
     <html>
        <head>
           <title> Resume </title>
           <link rel="stylesheet" type="text/css" href="resume_style.css"/>
        </head>
        <body>
           <xsl:apply-templates/>
       </body>
    </html>
 </xsl:template>
</xsl:stylesheet>
If the CSS file is in a different folder than the resulting HTML file will be, ensure that the href attribute includes the path to the CSS file.
Syntax of CSS rule
The following diagram shows the components of a CSS rule.
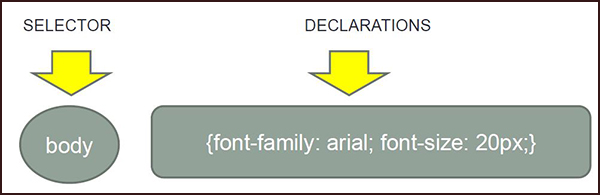
The syntax for the CSS statement includes a selector and the declaration.
- Selectors identify the HTML element to which to apply the style.
- Declarations define the style to apply. Declarations are:
- Enclosed within {}
- Separated by semi-colons
- Include the name of the property (font-family) and the value (Arial) separated by a colon
The following table shows a few of the properties commonly used to format HTML.
| Property |
Description |
Example |
font-family |
Specifies the font family that you want to use (such as arial or courier) |
body {font-family:arial;} |
font-style |
Specifies if you want the element to be italic, oblique, or normal |
p {font-style:italic;} |
font-size |
Specifies the size of the font |
p {font-size:12px;} |
font-weight |
Specifies if you want the element to be bold |
p {font-weight:bold;} |
list-style-type |
Specifies the style for lists (such as disc, circle, or lower-alpha) |
ul {list-style-type: circle;} |
margin (margin-top, margin-right, margin-bottom, margin-left) |
Specifies the margin for the element |
p {margin-left:20px;} |
padding (padding-top, padding-right, padding-bottom, padding-left) |
Specifies the padding for the element |
p {padding:0px;} |
text-align |
Specifies the alignment of the text
(such as center, right, or left). |
p {text-align:center;} |
For a more complete list of CSS properties see, http://www.w3schools.com/cssref/default.asp.
Using CSS classes in XSLT
Selectors can also use class attributes to identify elements upon which to apply styles. Class attributes allow you to style content based on an assigned class name instead of the HTML element name.
To identify the property to use for a particular class, use the following syntax:
elementName.className {property:value;}
Where:
- (optional) elementName is the name of the element to which you want to apply style
- className is the name of the class to which you want to apply style
- property is the name of the CSS property to apply
- value is the value of the property
The following table provides examples of using class statements:
| Sample |
Description |
.heading {margin:0px; text-align:center;}
|
Sets the margin of any element that has the class attribute of heading to 0px and aligns the text in the center. |
p.zipcode {font-size: 12px;}
|
Turns the font-size of any paragraph with a class attribute of zipcode to 12 px. |
.careerfocus {margin-left:50px;}
|
Adds a left margin of 50 px to any element with a class of careerfocus. |
p.school {font-weight:bold;}
|
Changes the font of any paragraphs with a class of school to bold. |
For example, if you wanted to distinguish between a paragraph used in your heading and one used in a school description, you could add a class attribute to the HTML:
<p class="heading">123 Main Street</p>
<p class="school"><b>B.A.</b>, <b>English</b>, <i>Elm University</i>, Los Angeles, CA 1989</p>
To style these elements, specify the relevant CSS styles:
.heading{margin-bottom:0px;    text-align:center;}
p.school {font-weight:bold;}
To use class statements as part of your XSL file:
- As you are constructing XSLT templates, add the class statements to the HTML skeleton you are building in your XSL file.
- Add the corresponding stylesheet rules either in an external stylesheet or to the <style> element within your XSL file.
The following XSL file shows how to include class attributes and styles internally. Note how the class attribute is applied to each of the elements that make up the heading.
<?xml version="1.0" encoding="UTF-8"?>
<xsl:stylesheet xmlns:xsl="http://www.w3.org/1999/XSL/Transform" version="1.0">
   <xsl:template match="/">
   <html>
      <head>
        <title>Bill Smith Resume</title>
        <style>
           body {font-family:arial;}
           .heading{margin:0px; text-align:center;}
           p.school {font-weight:bold;}
        </style>
    </head>
    <body>
      <xsl:apply-templates></xsl:apply-templates>
    </body>
  </html>
  </xsl:template>
  <xsl:template match="heading">
     <h1 class="heading">
     <xsl:value-of select="name/firstName"/>
     <xsl:text> </xsl:text>
     <xsl:value-of select="name/lastName"/>
  </h1>
  <p class="heading">
     <xsl:value-of select="address/streetAddress"/>
  </p>
  <p class="heading">
     <xsl:value-of select="address/city"/>
     <xsl:text>, </xsl:text>
     <xsl:value-of select="address/state"/>
     <xsl:text> </xsl:text>
     <xsl:value-of select="address/zipCode"/>
  </p>
  <p class="heading">
     <xsl:value-of select="email"/>
  </p>
  <p class="heading">
     <xsl:value-of select="phone"/>
  </p>
 </xsl:template>
</xsl:stylesheet>
When you generate the transformation, the processor generates the following HTML:
<html>
   <head>
      <meta http-equiv="Content-Type" content="text/html; charset=utf-8">
          <title>Bill Smith Resume</title>
          <style>
             body {font-family:arial;}
            .heading{margin:0px; text-align:center;}
            p.school {font-weight:bold;}
          </style>
   </head>
   <body>
     <h1 class="heading">Bill Smith</h1>
     <p class="heading">123 Main Street</p>
     <p class="heading">Austin, Texas 78501</p>
     <p class="heading">myName@aol.com</p>
     <p class="heading">512 555 1236</p>
   </body>
</html>
The following example shows how this would appear in a browser:

Using the class attribute is a good method for applying the same styles to a set of elements.
Summary
This lesson provides a high-level, simplified overview of CSS so that you can begin to apply a few styles to your transformations. For a more in-depth discussion about CSS, see the CSS tutorial at the W3schools website. You don’t have to create an elaborate CSS stylesheet for assignments in this class. Austin Community College offers another class, XHTML and CSS for Information Specialists, which covers CSS in much more detail.
CSS can format HTML pages in amazing ways. Check out http://www.csszengarden.com/ to see how different CSS stylesheets can format the same HTML content to get vastly different results.