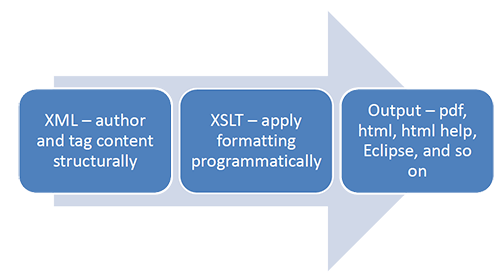
This week introduces the XSLT (Extensible Stylesheet Language Transformations) language. You use XSLT to transform your XML instance files into some output type. XSL provides the style specification for XML. XML provides the content; XSL applies style and layout to the content for the reader.
Defining a transformation can include multiple XML technologies:
- XSLT (XSL transformations) – specifies rules to change XML into another format (such as HTML).
- XSL-FO (XSL-Formatting Objects) – specifies how to lay out pages for print or PDF formats.
- XML Path Language (XPath) – provides syntax for identifying XML nodes to which to apply the formatting rules.
An XSLT file is an XML file. It uses a particular syntax that is described in the W3C XSLT specification. This syntax defines to an XSLT processor how to organize and style the information in the corresponding XML instance file to generate output.
This lesson describes how to use a subset of the elements defined for XSLT to create a basic transformation to turn an XML instance into a HTML page.
XML and nodes
XSL works by using an XSL transformation processor to build a tree representation of the XML instance file within the computer’s memory. The processor then matches the parts of the XML tree (called nodes) according to a set of rules provided in a document called a stylesheet. The XPath syntax is used to navigate and access the contents of these nodes.
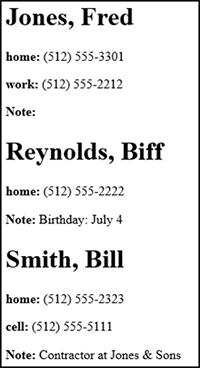
Assume that you have the following XML instance file:
<?xml version="1.0" encoding="UTF-8"?>
<!DOCTYPE contact_list SYSTEM "contact.dtd">
<contact_list> <!-- This is a comment in the code. -->
<contact>
 <name>
        <lastname>Smith</lastname>
        <firstname>Bill</firstname>
</name>
<phonenumber type="home">(512) 555-2323</phonenumber>
<phonenumber type="cell">(512) 555-5111</phonenumber>
<note>Contractor at Jones & Sons</note>
</contact>
<contact>
<name>
<lastname>Jones</lastname>
<firstname>Fred</firstname>
</name>
<phonenumber type="home">(512) 555-3301</phonenumber>
<phonenumber type="work">(512) 555-2212</phonenumber>
<note/>
</contact>
</contact_list>
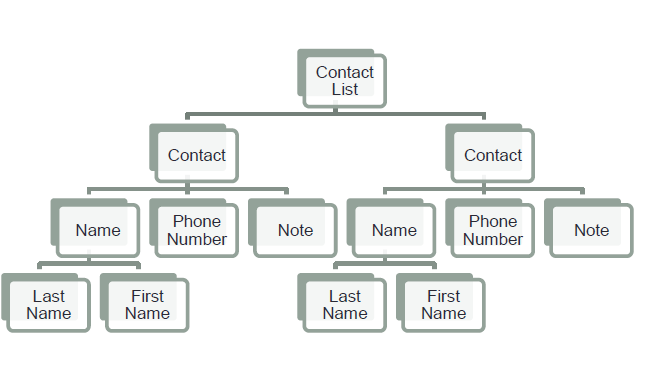
The following diagram provides a visualization of the contact list as a tree structure. The root element (contact_list) is at the top. The contact list includes child nodes called contacts. Contacts include nodes for names, phone numbers, and notes. Names include nodes for the last name and first name.
To use XPath to navigate the tree structure, you identify the path to that element relative to the element that the transformation is currently processing:
For example:
- If you were at the contact_list node, to identify a note node, use:
/contact/note
- If you were at the contact node, to identify the lastname node, use:
/name/lastname
- If you were at a contact node, to identify a phonenumber node, use:
/phonenumber
The following table summarizes some of the most commonly used XPath selectors:
| Selector |
Example |
. |
Matches the current node.
For example, if the current node being processed was:
<name>
<lastname>Smith</lastname>
<firstname>Bill</firstname>
</name>
Using a period (.) would match the entire contents of the <name> element (both the <lastname> and <firstname> child elements). |
.. |
Matches the parent node.
For example, assume the processor was currently on a <lastname> element. The .. symbol indicates to go back to the parent element (<contact>), and then /firstname indicates to match the <firstname> element for that contact. |
/ |
Matches the child element.
For example, if the processor was currently on a <contact> element, /name/lastname would match the contents of the child <lastname> element. |
@ |
Matches the value of an attribute.
If the processor is currently on a <phonenumber> element, @type would match the type attribute value for <phonenumber>. |
Subsequent sections describe how to use these selectors with <xsl> elements.
XSLT basics
XSLT provides a variety of elements that you can use to provide instructions to an XSLT processor to process the contents of your XML instance file. Because an XSLT file is itself an XML file, the XSLT file must follow all the same rules of well-formedness that an XML instance files does. All XSL elements must also have a corresponding closing tag.
An XSL element name always includes a prefix of xsl followed by a colon (for example, <xsl:stylesheet> or <xsl:value-of>). This prefix indicates that the element belongs to the xsl namespace.
For the purpose of this class, we are going to focus on the use of the following XSL elements. Subsequent sections will illustrate the use of these elements.
| Element |
Explanation |
<xsl:stylesheet>
|
<xsl:stylesheet> provides the root element for your XSLT file.
All other rules will be contained within the <xsl:stylesheet> element. |
<xsl:template>
|
<xsl:template> defines a rule for a particular element in your instance. The match attribute indicates the element to which the rule applies.
Example: If you had the template:
<xsl:template match="firstname"></xsl:template>
The rule would be applied to <firstname> elements. The match attribute uses XPath syntax to identify the element to match. |
<xsl:apply-template>
|
<xsl:apply-template> causes an <xsl:template> rule to be applied to the matched content. |
<xsl:value-of>
|
<xsl:value-of> extracts the content from the selected node.
Example: The following statement would extract the content of the <name> element.
<xsl:value-of select="contact_list/contact/name"/>
The select attribute uses XPath to identify the node for which you want to obtain the value. |
<xsl:for-each>
|
<xsl:for-each> loops through a list of items.
Example: The contact list example includes multiple contacts. <xsl:for-each> allows you to loop through all of the values in the list. |
<xsl:sort> |
<xsl:sort> allows you to sort a list of values.
Example: If you wanted to sort the names in a contact list alphabetically, you could use the <xsl:sort> element to do so. |
Components of a basic XSL document
The following example shows a very basic XSL document. This XSL transformation takes the content of an XML instance file, builds the structure for a simple HTML file, and outputs the contents within the <body> element of the HTML file.
<?xml version="1.0" encoding="UTF-8"?>
 <xsl:stylesheet xmlns:xsl="http://www.w3.org/1999/XSL/Transform" version="1.0">
 <xsl:template match="/">
   <html>
      <head>
      <title>Contact List</title>
    </head>
    <body>
      <xsl:apply-templates/>
    </body>
   </html>
  </xsl:template>
</xsl:stylesheet>
Note that XSLT file contains the following major sections:
XML declaration: <?xml version="1.0" encoding="UTF-8"?>
Because an XSLT file is an XML file, it needs an XML declaration just like your XML instance files do.
Namespace for stylesheet: <xsl:stylesheet xmlns:xsl="http://www.w3.org/1999/XSL/Transform" version="1.0">
The namespace identifies that the source of the XSL elements being used in the XSLT file is version 1 of the W3 XSL specification. All of the remaining XSL elements that you use must be contained within the <xsl:stylesheet> element.
Root template: <xsl:template match="/"> </xsl:template>
The root template matches the entirety of the XML instance document.
Apply template: <xsl:apply-templates/>
The apply template applies the corresponding template. In this example, the entire contents of the document gets placed within the <body> element of the resulting HTML file.
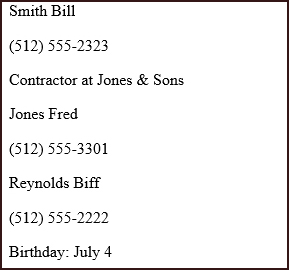
The results of the transformation are as follows. The output includes a long list of the content without any formatting applied.

Outputting the content of a single node
Instead of dumping out the entire contents in a single blob in the <body> element, you need to start breaking the contents apart. To do so, you will use the <xsl:value-of> XSLT element:
<?xml version="1.0" encoding="UTF-8"?>
<xsl:stylesheet xmlns:xsl="http://www.w3.org/1999/XSL/Transform" version="1.0">
    <xsl:template match="/">
      <html>
       <head>
         <title> Contact List </title>
       </head>
       <body>
          <p><xsl:value-of select="contact_list/contact/name"/></p>
       </body>
      </html>
    </xsl:template>
</xsl:stylesheet>
The <xsl: value-of> element is used to output the contents of a single node
<xsl:value-of select="contact_list/contact/name"/>
The contents of the select value (contact_list/contact/name) contains the XPath syntax to identify the name node.
In this example, the rule is telling the transform to publish the contents of the <name> node that is within a <contact> node that is within the <contact_list> node.
The result of this transformation is:
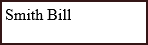
The results are incomplete – the output only includes the name of a contact and no phone numbers or notes. The output should contain the complete content for the contact.
Outputting the content of a series of nodes
The next step will be to try to get the contents of a series of nodes, each within its own paragraph. The following XSL shows how to build out that structure:
<?xml version="1.0" encoding="UTF-8"?>
<xsl:stylesheet xmlns:xsl="http://www.w3.org/1999/XSL/Transform" version="1.0">
   <xsl:template match="/">
     <html>
       <head>
          <title> Contact List </title>
      </head>
      <body>
         <p><xsl:value-of select="contact_list/contact/name"/></p>
         <p><xsl:value-of select="contact_list/contact/phonenumber"/></p>
         <p><xsl:value-of select="contact_list/contact/note"/></p>
      </body>
    </html>
   </xsl:template>
</xsl:stylesheet>
It includes multiple <xsl: value-of> statements, each one identifies a particular piece of information within a single contact.
The following example shows the results for this transformation:
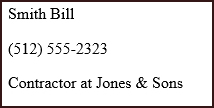
Some issues remain:
- Only the first contact in the list is being displayed.
- Only the first phone number for the contact is being displayed.
Looping through a list
To include all of the contacts within the output file, you need to loop across the entire list of contacts. To do so, use the <xsl:for-each> element as shown in the following example:
<?xml version="1.0" encoding="UTF-8"?>
  <xsl:stylesheet xmlns:xsl="http://www.w3.org/1999/XSL/Transform" version="1.0">
    <xsl:template match="/">
    <html>
      <head>
         <title> Contact List</title>
      </head>
      <body>
         <xsl:for-each select="contact_list/contact">
            <p><xsl:value-of select="name"/></p>
            <p><xsl:value-of select="phonenumber"/></p>
            <p><xsl:value-of select="note"/></p>
         </xsl:for-each>
    </body>
  </html>
 </xsl:template>
</xsl:stylesheet>
The <xsl:for-each select="contact_list/contact"> specifies that the contained <xsl:value-of> statements should be executed for each contact in the contact list. Note that the ending tag for the <xsl:for-each> statement occurs after all three <xsl:value-of> statements.
Also notice that select attributes for the <xsl:value-of> statements have changed to remove contact_list/contact. Because the <xsl:value-of> elements are embedded within the <xsl:for-each> element, the paths of the select attributes use the contact_list/contact as their starting node.
If you generate this transformation, the output is as follows:
The output now displays an entry for each contact; however, a problem remains. It is displaying only one phone number per contact. We know that some of the contacts have multiple phone numbers associated with them.
Adding a nested <xsl:for-each> element
To include all phone numbers in the output, you need to add a second <xsl:for-each> element to process multiple phone numbers within each individual contact. The following example illustrates this syntax.
<?xml version="1.0" encoding="UTF-8"?>
<xsl:stylesheet xmlns:xsl="http://www.w3.org/1999/XSL/Transform" version="1.0">
  <xsl:template match="/">
      <html>
        <head> <title> Contact List </title> </head>
        <body>
            <xsl:for-each select="contact_list/contact">
               <p><xsl:value-of select="name"/></p>
               <ul>
                  <xsl:for-each select="phonenumber">
                      <li> <p> <xsl:value-of select="."/> </p></li>
                  </xsl:for-each>
              </ul>
              <p><xsl:value-of select="note"/></p>
         </xsl:for-each>
     </body>
   </html>
  </xsl:template>
</xsl:stylesheet>
Because you are using the select attribute in the <xsl:for-each> element to match the phone number, use a period (.) within the select attribute of <xsl:value-of> element to indicate that you want the contents of the current node.
Note the placement of the <ul> and <li> HTML tags in the example to create an unordered list in the output.
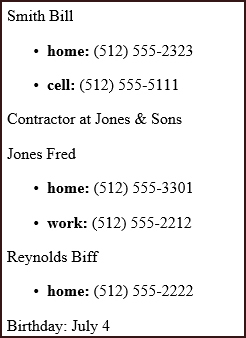
The results for this transformation are as follows:

The output finally includes all the content; however, it does not identify the type of phone numbers (cell, work, or home). This information was included as attributes on the <phonenumber> element.
Using the values of attributes to affect output
In our contact list example, the phone numbers had attributes that indicated the type of number that they were.
<phonenumber type="home">(512) 555-2323</phonenumber>
<phonenumber type="cell">(512) 555-5111</phonenumber>
You can use a<xsl:value-of>statement to pull the value of the type attribute out of the <phonenumber> element and make it part of the content of the html file.
<xsl:value-of select="@type"/>
The @ sign indicates to the XSLT processor that the selection type is an attribute.
The following XSLT example illustrates pulling the attribute value from the XML instance.
<?xml version="1.0" encoding="UTF-8"?>
<xsl:stylesheet xmlns:xsl="http://www.w3.org/1999/XSL/Transform" version="1.0">
  <xsl:template match="/">
     <html>
        <head> <title> Contact List </title> </head>
        <body>
           <xsl:for-each select="contact_list/contact">
             <p><xsl:value-of select="name"/></p>
             <ul>
                <xsl:for-each select="phonenumber">
                     <li><p><b><xsl:value-of select="@type"/>: </b>
                     <xsl:value-of select="."/></p></li>
                </xsl:for-each>
             </ul>
            <p><xsl:value-of select="note"/></p>
         </xsl:for-each>
      </body>
    </html>
   </xsl:template>
</xsl:stylesheet>
The following example shows the results of this transformation. The value of the attribute (home, cell, or work) now appears in front of the phone number.
Finally, you have all of the output of the contact list; however, the names could use some formatting. The last name is first without a comma between the two.
Formatting the name
The name is actually stored in two parts in your XML instance:
<name>
  <lastname>Smith</lastname>
  <firstname>Bill</firstname>
</name>
-
To insert a comma between the last name and first name, create two <xsl:value-of> elements.
<p><b><xsl:value-of select="name/lastname"/>,

              <xsl:value-of select="name/firstname"/></b></p>
-
To order the name with first name listed before the last name, change the order of the <xsl:value-of> elements. Add the <xsl:text> statement between them to add a space.
<p><b><xsl:value-of select="name/firstname"/><xsl:text> </xsl:text>

              <xsl:value-of select="name/lastname"/></b></p>
The following example shows the first of these approaches:
<?xml version="1.0" encoding="UTF-8"?>
<xsl:stylesheet xmlns:xsl="http://www.w3.org/1999/XSL/Transform" version="1.0">
   <xsl:template match="/">
      <html>
        <head> <title> Contact List </title> </head>
        <body>
            <xsl:for-each select="contact_list/contact">
                  <p><b><xsl:value-of select="name/lastname"/>,
                        <xsl:value-of select="name/firstname"/> </b></p>
                  <ul>
                     <xsl:for-each select="phonenumber">
                           <li><p><b><xsl:value-of select="@type"/>: </b>
                           <xsl:value-of select="."/></p></li>
                     </xsl:for-each>
                  </ul>
                  <p><xsl:value-of select="note"/></p>
             </xsl:for-each>
        </body>
     </html>
   </xsl:template>
 </xsl:stylesheet>
This transformation produces the following output:
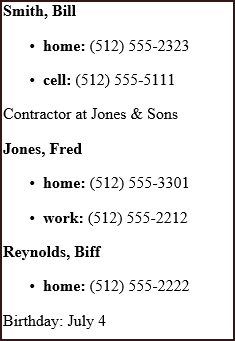
Both names are now bold, in the right order, and a comma place between them.
Sorting a list
You can sort a collection of peer nodes (such as the list of contacts) in the output by using the <xsl:sort> statement.
In our example, assume you wanted to sort the list by last name. Insert <xsl:sort select=“name”> prior to the rule for the names within the <xsl:for-each> loop. Note that <xsl:sort> is an empty element.
<?xml version="1.0" encoding="UTF-8"?>
<xsl:stylesheet xmlns:xsl="http://www.w3.org/1999/XSL/Transform" version="1.0">
  <xsl:template match="/">
  <html>
    <head> <title> Contact List </title> </head>
    <body>
       <xsl:for-each select="contact_list/contact">
          <xsl:sort select="name"/>
          <p><b><xsl:value-of select="name/lastname"/>, <xsl:value-of select="name/firstname"/> </b></p>
          <ul>
             <xsl:for-each select="phonenumber">
                <li><p><b><xsl:value-of select="@type"/>: </b> <xsl:value-of select="."/></p></li>
             </xsl:for-each>
          </ul>
          <p><xsl:value-of select="note"/></p>
       </xsl:for-each>
    </body>
  </html>
 </xsl:template>
</xsl:stylesheet>
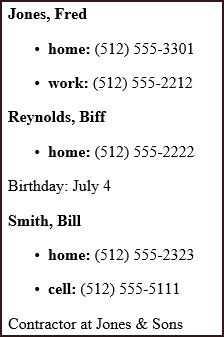
The following example shows the results of running this transformation. The output is now sorted by name.
Another method for defining your stylesheet
The previous examples illustrate one method for defining your stylesheet that works well for smaller, well-structured documents.
An alternative method for more complex documents is to create an <xsl:template> element for most major elements in your source XML document.
Within each <xsl:template> specification, designate the styles and hierarchy for that rule and possibly child nodes.
The following example illustrates using the <xsl:template> element to create a new template for different sections within your XML instance file. In this example, you have a template for contact_list, contact, name, phone numbers, and notes. The advantage to this method is it reduces the complexity of having multiple, nested <for-each> statements.
<?xml version="1.0" encoding="UTF-8"?>
<xsl:stylesheet xmlns:xsl="http://www.w3.org/1999/XSL/Transform" version="1.0">
   <xsl:template match="/">
       <html>
          <head> <title> Contact List </title> </head>
          <body> <xsl:apply-templates/> </body>
       </html>
    </xsl:template>
    <xsl:template match="contact_list">
       <xsl:apply-templates select="contact">
           <xsl:sort select="name"/>
       </xsl:apply-templates>
       </xsl:template>
       <xsl:template match="contact">
           <xsl:apply-templates/> </xsl:template>
        <xsl:template match="name">
            <h1><xsl:value-of select="lastname"/>,
            <xsl:value-of select="firstname"/></h1>
        </xsl:template>
        <xsl:template match="phonenumber">
               <p><b><xsl:value-of select="@type"/>: </b><xsl:value-of select="."/></p>
        </xsl:template>
        <xsl:template match="note">
            <p><b>Note: </b><xsl:value-of select="."/></p>
        </xsl:template>
</xsl:stylesheet>
This transformation results in the following output. This output looks identical to the previous example. The transformation uses a different approach to achieve the same outcome.
The transformation produces an alphabetized list of contacts.
Working with transformations within oXygen
Creating a new XSLT file
- In oXygen, select the File > New.
- In the New window, expand the New Document folder and select XSLT Stylesheet.
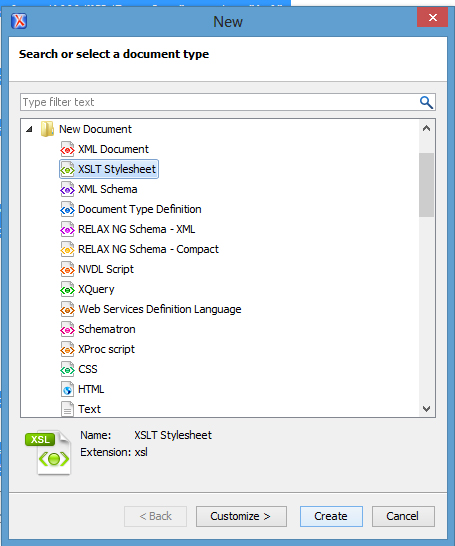
- Click the Create button. An XSLT stylesheet file is created (with the xslt extension).
- Populate the file with the root element transform.
<?xml version="1.0" encoding="UTF-8"?>
<xsl:stylesheet xmlns:xsl="http://www.w3.org/1999/XSL/Transform" version="1.0">
   <xsl:template match="/">
   <html>
      <head>
         <title>Contact List</title>
      </head>
      <body>
         <xsl:apply-templates/>
      </body>
   </html>
  </xsl:template>
</xsl:stylesheet>
- Specify other transformation rules, as needed.
- Save the file.
Configure the transformation to work with your xml file
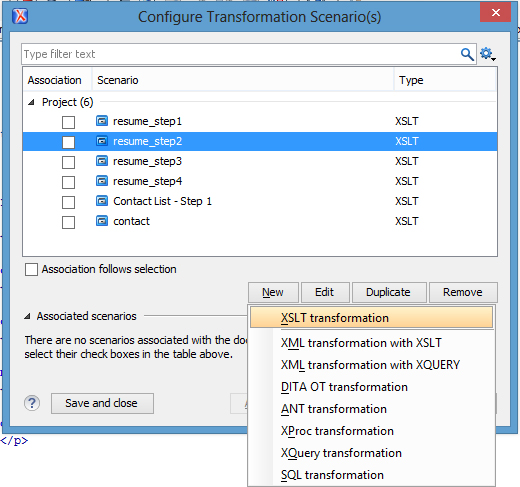
- In oXygen, while in your XSLT file, select Document > Transformations > Configure Transformation Scenarios.
- In the Configure Transformation Scenarios window, click New and select XSLT Transformation.You only have to configure each XSLT file once.
- In the New Scenario window, enter a name for the scenario in the Name field on the XSLT tab.
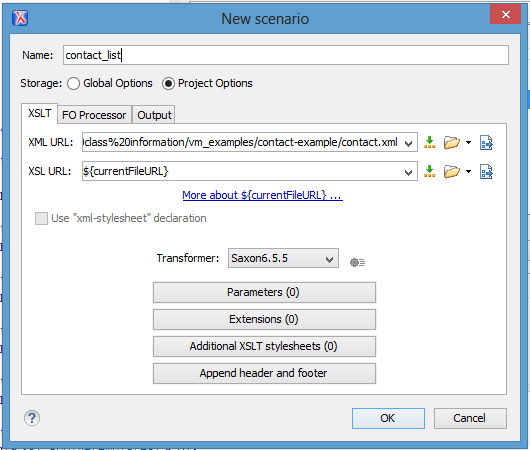
The scenario is a descriptive phrase for what you want to call this particular transformation configuration. Enter a name that is meaningful for you.
- In the XML URL field, navigate to your XML instance file and select it.
- Leave XSL URL at the default value. This value indicates that the current file is the one to use as the XSL file.
- On the Output tab, select the Save As radio button and enter a name for the output file. Ensure that .html is the file extension.
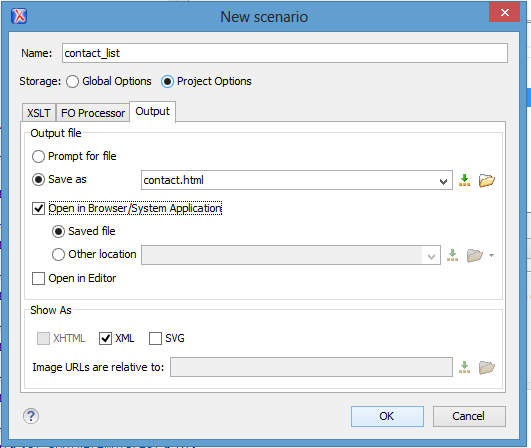
- Select the Open In Browser /Server Application check box, and click OK.
- Click Save and Close.
Running your transformation
In oXygen, select Document > Transformation > Apply Transformation Scenario. You can do this after each time you change your transformation to see what each change does.