Elements and Attributes
What you created in the first assignment is a well-formed document, which means that the document conforms to basic XML rules. These rules include such things as:
- Element names must conform to element-naming rules.
- Elements names cannot include spaces.
- Elements must be nested appropriately.
In addition to these rules, a document can be validated against a Document Type Definition (DTD) to determine if the file is valid. A DTD defines rules specific to the elements that you create in your XML files. The DTD will contain a rule for each element and attribute that you create. When you validate or transform a document, an XML processor compares your XML document to the DTD to validate that the document conforms to the rules defined in the DTD. For structured authoring, you will want rules to define such things as the structure of a topic or the components of a step. The next reading assignment will cover DTDs in more detail.
The following figure summarizes the relationship between XML files, DTDs, XSLT, and your output.
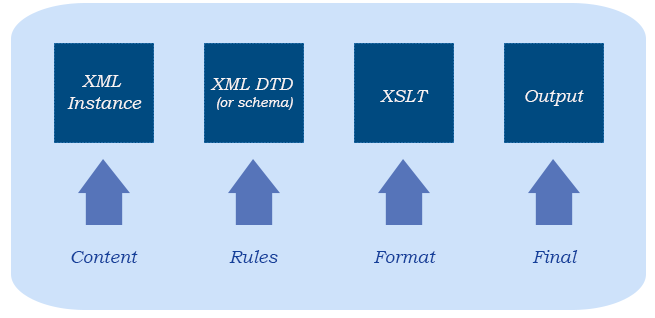
You create content in an XML file (also called an XML instance). That file conforms to the rules of the DTD. You then use XSLT to format the XML instance into some output type (like PDF, HTML, Eclipse, and so on).
The reading for this week dives more into elements and introduce attributes. While elements contain content, attributes contain additional metadata about that content.
This lesson will also discuss how to approach constructing a more complex well-formed document.
Note: If you were to view XML as a programming language instead of an authoring platform, you would use schemas. Schemas provide an alternative to DTDs that include more robust data typing than DTDs; however, they are more complex to develop. For example, when defining a schema you can specify the type of data a particular element would contain, such as an integer or a date. This basic course is only going to cover DTDs. For information about schemas, you can see the W3Schools tutorial for schemas.
Defining elements
Elements are the basic building blocks of an XML document. When you structure information within an XML document, you are creating elements that define the content being included as well as organize that information into a consistent structure.
Naming elements
When you name an element, you should describe the content of that element (for example, firstname, lastname, or address).
Do not name elements to define format (for example, bold or font). Instead, name the elements to describe what something is and the information that it contains.
The names of elements:
- Can contain any alphanumeric character
- Can contain underscores, hyphens, and periods
- Cannot begin with a number or a punctuation character
- Cannot contain spaces
You should develop a consistent pattern for defining names within your XML file. Decide whether to make your names always lower-case or mixed-case. For example, avoid naming the element for the first name <Firstname> and the element for the last name <lastname>. Deciding on a standardized way of naming elements makes it easier to remember their names and reduces errors later when you try to use the elements.
Some strategies that people use to distinguish between words in a multi-word element name include using:
- Underscores: <first_name>, <last_name>, or <zip_code>
- Capital letters: <firstName>, <lastName>, or <zipCode> (This naming technique is also called camel case.)
- Hyphens: <first-name>, <last-name>, or <zip-code>
It does not matter which of the techniques you use—just try to make it consistent. Doing so increases the readability of your document and make it easier for you to remember the element names. After you name an element, always ensure that all instances of that element within your document use the exact case and punctuation or errors will occur.
Defining the contents of elements
An element can contain
- Nested elements
- Data
- A mixture of elements and data
- Nothing (an empty element)
Example of element contents
Content |
Example |
text |
<firstname>Bill</firstname>
<lastname>Smith</lastname> |
elements |
<address>
   <street_address>121 Maple Street</street_address>
   <city>Oakwood</city>
   <state>Iowa</state>
   <zip_code>50648</zip_code>
</address> |
mixture |
<description>
 The <fieldname>Home</fieldname> field includes the URL of your home page.
</description> |
empty |
<image filename=“turtles.jpg”/> |
Defining attributes
In addition to elements, you can define attributes to apply to the elements.
Attributes are used to provide additional information about the element and its content. It is metadata about the element itself. If an element is a thing (noun), an attribute is like a quality (adjective) of the thing described.
For example, the type attribute in the following example defines the type of phone number associated with the <phonenumber> element:
<phonenumber type="cell">(512) 555-2103</phonenumber>
Attributes consist of two parts (a name-value pair):
- The name of the attribute. This name should describe what the attribute value should contain.
- The value for that attribute. That value must be includes within quotation marks.
Examples:
<article item_number=“32123”>…</article>
<weight units=“pounds”>5</weight>
<memo type=“reminder”>…</memo>
An attribute can have multiple values associated with it:
<task user_type=”novice advanced”>
When an attribute has multiple values, each value is separated with a space. Note that an individual attribute value cannot have spaces. For example, if you had the element <task user_type=”novice user”>, the XML parser would handle each of the values novice and user as a different attribute value.
If you wanted them treated as a single value, you would need to concatenate the words together:
<task user_type=”novice_user”>
Rules for attributes
When creating attributes, consider the following rules:
- An element can have as many attributes as needed.
- No two attributes for the same element can have the same name.
- Attribute values must always be enclosed in quotation marks.
- You cannot use a special character (<, >, &) within the attribute value.
- Attributes have the same naming rules as elements (for example, they cannot begin with a number or include spaces).
Choosing elements vs. attributes
The following table describes advantage for choosing an attribute or an element.
| Advantages of |
Description |
| attributes |
- Less verbose than including an element
- Can have a default value
- Can limit a value to one in a prescribed list
- Example:
<weight unit="pounds">125</weight>
|
| elements |
- Are more human readable
- Can occur more than once (attributes can occur only once per element)
- Can include child elements
- Can have more rules and logic built around them (such as sequence)
- Example: <
weight><amount>126</amount><units>pounds</units></weight>
|
Consider the contact list example from the reading for Week 1 (Introduction to XML). That example included three different elements for phone numbers:
<phonenumber_home>(512) 555-2323</phonenumber_home>
<phonenumber_cell>(512) 555-5111</phonenumber_cell>
<phonenumber_work>(512) 555-2212</phonenumber_work>
Instead of three elements, the XML file could have had a single element (<phonenumber>) and used an attribute (type) to identify the type of phone number:
<phonenumber type="home">(512) 555-2323</phonenumber>
<phonenumber type="cell">(512) 555-5111</phonenumber>
<phonenumber type="work">(512) 555-2212</phonenumber>
Using attributes
in this case reduces the number of elements that you have define, while the type attribute clearly defines the type of phone number that it is.
Special characters in XML
Some characters have special meaning in XML and cannot be used in content, such as a < or > symbol. When a browser or XML parser processes those characters, it expects them them to be the beginning symbol or end symbol of a tag.
If you want to use one of those characters within the text of your content, you must use something called a character entity (or character reference).
A character entity begins with an ampersand (&), followed by the code for that character, and closed with a semi-colon (;). For example, the character entity for the < symbol is <. ;. To use this character entity in the content of your document, you would add it as follows:
<p>This is my sentence that includes a < symbol.</p>
When that sentence gets rendered in a browser or transformed into output, it would be replaced with the proper symbol:
This is my sentence that includes a < symbol.
The following table lists the special characters that are defined within XML. A later lesson discusses how to create your own entities.
Special characters |
Character reference |
& (ampersand) |
& |
< (less than) |
< |
> (greater than) |
> |
“ (quote) |
" |
„ (apostrophe) |
' |
The following examples illustrate using the entity for the ampersand (&) and the apostrophe (').
- Example of using ampersand:
| Input: |
<note>Contractor at Jones & Sons</note> |
| Output: |
When transformed, the content displays the ampersand: Note: Contractor at Jones & Sons. |
- Example of using an apostrophe:
| Input: |
<note>Birthday: July 31st; He's Julia's cousin</note> |
| Output: |
When transformed, the content displays the apostrophes:
Note: Birthday: July 31st; He's Julia's cousin. |
Adding comments
You can add comments to your XML file by beginning the comment with <!-- and ending the comment with -->. Comments will not appear in transformed output. The following example shows a simple comment.
<contact_list>
 <!-- This is a comment in the code. -->
  <contact>
    <name>
     <lastname>Smith</lastname>
     <firstname>Bill</firstname>
   </name>
  </contact>
</contact_list>
You can use comments to comment out part of your XML code, so that that content is not included in output if you transform the document.
  <!--Comment out this name so we don’t use it.
    <name>
      <lastname>Smith&tt;/lastname>
      <firstname>Bill&tt;/firstname>
    </name>
  -->
You cannot nest comments within comments
<!--Put one comment here
    <name>
      <!--Don’t do this it won’t work -->
      <lastname>Smith</lastname>
      <firstname>Bill</firstname>
    </name>
  -->
Let’s take a closer look at creating well-formed documents. Before you can create a DTD to define the rules for a well-formed document, you need to analyze your document to determine its structure and the elements and attributes that you are going to need to make up that document.
Examine the structure of the document
For the next assignment, you are going to create a resume using XML. First, look at an example of a resume document. I obtained this example from a Microsoft Word template. For your assignment, I recommend that you look at multiple examples to see what resumes have in common.
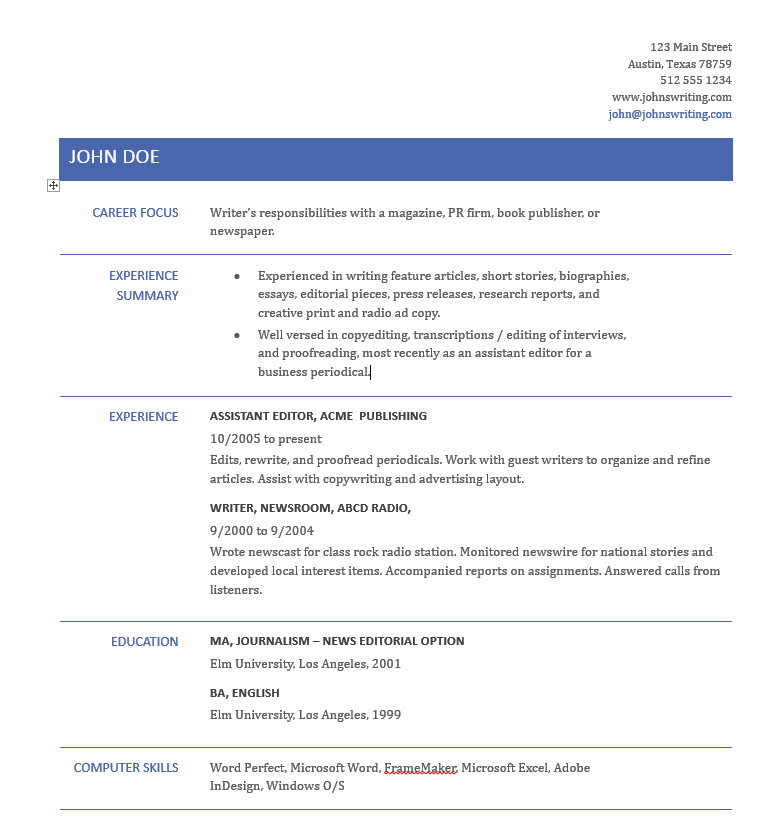
This resume can be broken down into the following major sections:
- Personal Information
- Career focus
- Experience Summary
- Experience
- Education
- Computer Skills
Creating the major sections of your document within XML
Create a XML document that contains a root-level element () and a container element for each of the high-level sections that you identify. Ensure that the names that you give the elements reflect their content.
<?xml version="1.0" encoding="UTF-8"?>
<resume>
    <personal_information></personal_information>
    <career_focus></career_focus>
    <experience_summary></experience_summary>
    <experience></experience>
    <education></education>
    <computer_skills></computer_skills>
</resume>
Decide on the naming convention that you want to use and ensure that all elements follow that naming convention. In this sample, all element names use all lower-case letters and divide words in the element name with underscores.
Defining the elements for a particular section
Look at the detailed information for a section and see what types of information is included within that section. For this example, examine the contents of the Education section.
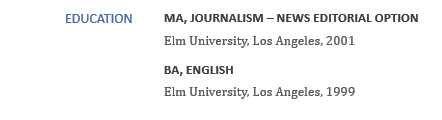
Note that the education system lists two degrees. Each degree has the same type of information within it:
- The name of the university (Elm University in both cases)
- The type of degree (M.A. and B.A)
- The discipline of the degree (Journalism – News Editorial Option and English)
- The city in which the university is located (Los Angeles in both cases)
- The year in which the degree is earned 2001 and 1999)
You can then create an empty structure for the information. You identify the organization of the information and the names that you want to use:
  <?xml version="1.0" encoding="UTF-8"?>
<resume>
    <personal_information></personal_information>
    <career_focus></career_focus>
    <experience_summary></experience_summary>
    <experience></experience>
    <education>
        <school>
            <name></name>
            <degree></degree>
            <discipline></discipline>
            <year></year>
            <location></location>
        </school>
    </education>
    <computer_skills></computer_skills>
</resume>
Repeat the structure for each degree that you have:
<school>
   <name>Elm University</name>
   <degree>M.A.</degree>
   <discipline>Journalism – News Editorial Option </discipline>
   <year>1992</year>
   <location>Los Angeles</location>
</school>
<school>
   <name>Elm University</name>
   <degree>B.A.</degree>
   <discipline>English </discipline>
   <year>1992</year>
   <location>Los Angeles</location>
</school>
Note: You could have decided to define some of this information as attributes:
<school degree=”M.A.” year=”1992”>
   <name>Elm University</name>
   <discipline>Journalism – News Editorial Option </discipline>
   <location>Los Angeles</location>
</school>
You have a lot of flexibility when it comes to defining the structure of your information. Some things to consider:
- Always try to group a set of related information together. Avoid structuring something as follows:
<education>
   <name>Elm University</name>
   <degree>M.A.</degree>
   <discipline>Journalism – News Editorial Option </discipline>
   <year>1992</year>
   <location>Los Angeles</location>
   <name>Elm University</name>
   <degree>B.A.</degree>
   <discipline>English </discipline>
   <year>1992</year>
   <location>Los Angeles</location>
</education>
This example contains all of the information, but you don’t know how the information relates to each other. You can infer by the location that the M.A. degree goes with the Journalism discipline, but the structure in and of itself does not confirm this.
Always group the objects that are related together within a container – in this case, by entering the school element around all of the information for the particular school.
<school>
   <name>Elm University</name>
   <degree>M.A.</degree>
   <discipline>Journalism – News Editorial Option </discipline>
   <year>1992</year>
   <location>Los Angeles</location>
</school>
Because the other elements are nested within the <school> element, they are children of the school element and can be processed as a unit.
Remember that you do not need to include formatting information within the well-formed document. Although you see bullet lists in your resume example, you don’t necessarily have to have something equivalent to an HTML list (ol) and list item (li). You can add the formatting for that later in your XSLT.
For example, for your job description section, you could have something like the following structure:
<job_list>
    <job>
        <title></title>
        <company></company>
        <location>
            <city></city>
            <state></state>
        </location>
        <years></years>
        <duties>
            <duty></duty>
            <duty></duty>
        </duties>
    </job>
</job_list>
If you decide that you want to add bullets to the in front of the individual job duties, you would define that as a style within your XSLT file for the <duty> elements.
Complete this process for each section
You should repeat the process that you followed for the Education section for each section in the resume. This process of examining content to determine structure is often called information modeling in structured authoring. The end result of information modeling can be an information model to which all documents of that particular type should conform. When you create information models, you should not just consider what the information looks like in your examples. Instead, you should focus on how the information should be structured in an ideal world. The role of XML in this process is that to allow you to programmatically enforce that structure through the use of rules defined in DTDs.
Scenario – Importance of not defining by formatting
Consider this scenario. Assume that you are designing elements for a software product. The style guide indicates that you should
- bold all key names (F9, Enter, Ctrl)
- bold all user interface field names (Name field, Database name, Table name)
After you release the first version, the product team decides that they want all key names italicized instead of bold.
If you created a single <bold> formatting element to tag both key names and field names, you would have to retag all of your key names in all of your source files to a different <italics> type element. In a topic-based authoring environment, a single deliverable could have hundreds of source topics.
Now instead consider what would have happened if you had created two semantically named elements (<keyname> and <fieldname>). You wouldn't have to change your source files because no formatting is defined in those files. Instead, you would have to change the formatting in a single place in your XSLT style sheet file. The next time you transformed the source content, all occurrences of <keyname> element would use the updated format.
Summary
This article provides a high-level overview of the relationship of DTDs and XML instance files. It also provides more information about how to define elements and attributes. Finally, it describes the process to review example files to build out more complex well-formed documents.
The next lesson will provide more information about DTDs and their creation.